All Python codes have been successfully executed on Python 3.5 (32 bits) and Anaconda Navigator (anaconda3)
Content:
- Lecture :1 : If else, for loop, function, factorial etc.
- Lecture :2 : String manipulation
- Lecture :3 : Class and object using python
- Lecture :4 : Dirty hands with Pandas
- Lecture :5: Working on Numpy
- Lecture :6 : How Image Processing works in Python
- Lecture: 7: OpenCV Programs
- Web References and further reading
Lecture_1_Practical_1
you working as software developer. one of your
customer is planning to make 50% discount on the products that he is
selling so he asked you to design a program that gives the price of the any
product after 50% discount
discount_rate=50/100
original=int(input('what is the
original price for the produt '))
sales_price=original*discount_rate bits
print('the price after 50%
discount is $',int(sales_price),sep='')
define function for three different numbers:
def sign(x):
if x > 0:
return 'positive'
elif x < 0:
return 'negative'
else:
return 'zero'
for x in [-1, 0, 1]:
print(sign(x))
LECTURE_1_PRACTICAL_2_PASS+OR+FAIL
your teacher asked from you to write a program that
allows her to enter student 4 exam result and then the program calculates the
average and displays whether student passed the semester or no. in order to
pass the semester, the average score must be 50 or more.
number_of_exams=4
#ask from the user each exam score
exam1=int(input('enter the first
exam result: '))
exam2=int(input('enter the second
exam result: '))
exam3=int(input('enter the third
exam result: '))
exam4=int(input('enter the fourth
exam result: '))
#get the total of all exams
total=exam1+exam2+exam3+exam4
average_score=total/number_of_exams
if average_score>=50:
print('the
student passed the semester')
else:
print('the
student failed the semester')
Lecture_1_practical_3_pass+percentage
write a program that gives the percentage of student
who passed in a class and the percentage of students who failed in a class
#get number of students who
passed
passed=int(input('enter number of
students that passed the exam: '))
#get numer of students who failed
failed=int(input('enter number of
students that failed in the exam: '))
#total number of students in the
class
total=passed+failed
print('total of students:
',total)
#get percentages
pass_percentage=passed/total
fail_percentage=failed/total
print(format(pass_percentage,'.0%'),'of
students passed in the class')
print(format(fail_percentage,'.0%'),
'of students failed in the class')
Lecture_1_practical_4__score+into+grade
design a program that converts student score into
grades (a,b,c,d, and failed)
#ask for student score
score=int(input('enter your
score: '))
if score>=90:
print('your
grade is a')
elif score>=80:
print('your
grade is b')
elif score>=70:
print('your
grade is c')
elif score>=60:
print('your
grade is d')
else:
print('you
failed')
print('you
need to study harder')
click here for entire notes
Lecture_1_practical_5_player
score
Design a program with Python using list. The program
will ask from the user to enter the players score and after it will show the
highest score
score_list=[]
print('How many scores you want to add?')
num_score=int(input())
hi_score=0
for i in range(num_score):
print('Enter the',i+1,'score')
n=int(input())
if n>hi_score:
hi_score=n
score_list.append(n)
print('The scores that you entered:')
print(score_list)
print()
print('The Highest score is',hi_score)
Lecture_1_practical_6_factorial
your math teacher know that you have good
programming skills. she asked from you to design a program for her that will
find factorial for any number. she will use your program in her classes so make
it elegant. ( example: factorial of 3 is 3*2*1=6, factorial of 4 is 4*3*2*1 =
24, factorial of 5 is 5*4*3*2*1= 120)
#this is recursion function
def factorial_func(n):
#this is the
base case
#program will
stop calling it self
#when it
reaches base case
if n==0:
return 1
#this is
recursive case
#program will
keep calling it self
#but each time
it will be smaller
#than before
until it reaches
#the base case
else:
return n*factorial_func(n-1)
def main():
n=int(input('enter a number to get factorial '))
#display the
factorial of the number
print('the
factorial for', n,'is',factorial_func(n))
main()
Lecture_1_practical_7_sentinel
you working in a shipment company. your manager
asked from you to design a program that allows them to enter items weight in
order to be saved in the shipment file. your program should have a sentinel
value, if the user finished adding all the items, then he will enter the
sentinel value to stop the program
print('please enter the item
weight')
print('or enter 0 to stop the
program')
item_weight=int(input())
#as long as the condition is true
#than the loop will keep
iterating
while item_weight!=0:
print('please
enter the item weight')
print('or
enter 0 to stop')
item_weight=int(input())
print('all the items will be
saved to the file')
print('thank you')
Lecture_1_practical_8__fibonacci
fibonacci
def fib(n):
if n==0:
return 1
if n==1:
return 1
else:
return (fib(n-1)+fib(n-2))
def main():
print('the
first 8 numbers in fibonacci is')
for i in
range(8):
print(fib(i))
main()
Lecture_1_practical_9_gcd
your math teacher liked your first program. this
time she asked from you to design a program that will find greatest common
divisor of two given integers. she will give extra grades if you complete this
project.
def gcd(x,y):
if x%y==0:
return(y)
else:
return (gcd(y,x%y))
num1=int(input('enter an integer
'))
num2=int(input('enter another
integer '))
print('gcd for them is
',gcd(num1,num2))
click here for entire notes
Lecture_1_practice_10__real
design a program that allows your teacher to enter
the result of three exam and it shows the average score.
number_of_exams=3
exam1=int(input('enter the first
exam result: '))
exam2=int(input('enter the second
exam result: '))
exam3=int(input('enter the third
exam result: '))
average_score=(exam1+exam2+exam3)/number_of_exams
print('the average score:
',format(average_score, '.1f'))
----------------------------------------------
Lecture_2_Practical_1_String
Manipulation
In
computer science, sequences of characters are referred to as strings. Strings
can be any length and can include any character such as letters, numbers,
symbols, and whitespace (spaces, tabs, new lines).
Escaping
Characters
Backslashes
(\) are used to escape characters in a Python string.
For
instance, to print a string with quotation marks, the given code snippet can be
used.
txt = "She said
\"Never let go\"."
print(txt) # She said
"Never let go".
The
in Syntax
The
in syntax is used to determine if a letter or a substring exists in a string.
It returns True if a match is found, otherwise False is returned.
game = "Popular
Nintendo Game: Mario Kart"
print("l" in
game) # Prints: True
print("x" in
game) # Prints: False
Lecture_2_Practical_2_Indexing
and Slicing Strings
Python
strings can be indexed using the same notation as lists, since strings are
lists of characters. A single character can be accessed with bracket notation
([index]), or a substring can be accessed using slicing ([start:end]).
Indexing
with negative numbers counts from the end of the string.
str = 'yellow'
str[1] # => 'e'
str[-1] # => 'w'
str[4:6] # => 'ow'
str[:4] # => 'yell'
str[-3:] # => 'low'
Iterate
String
To
iterate through a string in Python, “for…in” notation is used.
str =
"hello"
for c in str:
print(c)
# h
# e
# l
# l
# o
Built-in
Function len()
In
Python, the built-in len() function can be used to determine the length of an
object. It can be used to compute the length of strings, lists, sets, and other
countable objects.
length =
len("Hello")
print(length)
#
Output: 5
colors = ['red',
'yellow', 'green']
print(len(colors))
#
Output: 3
String
Concatenation
To
combine the content of two strings into a single string, Python provides the +
operator. This process of joining strings is called concatenation.
x = 'One fish, '
y = 'two fish.'
z = x + y
print(z)
#
Output: One fish, two fish.
Immutable
strings
Strings
are immutable in Python. This means that once a string has been defined, it
can’t be changed.
There
are no mutating methods for strings. This is unlike data types like lists,
which can be modified once they are created.
IndexError
When
indexing into a string in Python, if you try to access an index that doesn’t
exist, an IndexError is generated. For example, the following code would create
an IndexError:
fruit =
"Berry"
indx = fruit[6]
Python String
.format()
The
Python string method .format() replaces empty brace ({}) placeholders in the
string with its arguments.
If
keywords are specified within the placeholders, they are replaced with the
corresponding named arguments to the method.
msg1 = 'Fred scored {}
out of {} points.'
msg1.format(3, 10)
#
=> 'Fred scored 3 out of 10 points.'
msg2 = 'Fred {verb} a
{adjective} {noun}.'
msg2.format(adjective='fluffy',
verb='tickled', noun='hamster')
#
=> 'Fred tickled a fluffy hamster.'
String
Method .lower()
The
string method .lower() returns a string with all uppercase characters converted
into lowercase.
greeting =
"Welcome To Chili's"
print(greeting.lower())
#
Prints: welcome to chili's
String
Method .strip()
The
string method .strip() can be used to remove characters from the beginning and
end of a string.
A
string argument can be passed to the method, specifying the set of characters
to be stripped. With no arguments to the method, whitespace is removed.
text1 = ' apples and oranges '
text1.strip() # => 'apples and oranges'
text2 = '...+...lemons
and limes...-...'
# Here we strip just
the "." characters
text2.strip('.') # => '+...lemons and limes...-'
# Here we strip both
"." and "+" characters
text2.strip('.+') # => 'lemons and limes...-'
# Here we strip
".", "+", and "-" characters
text2.strip('.+-') # => 'lemons and limes'
click here for entire notes
Lecture_2_Practical_3_String
Method .title()
The
string method .title() returns the string in title case. With title case, the
first character of each word is capitalized while the rest of the characters
are lowercase.
my_var = "dark
knight"
print(my_var.title())
#
Prints: Dark Knight
String
Method .split()
The
string method .split() splits a string into a list of items:
If
no argument is passed, the default behavior is to split on whitespace.
If
an argument is passed to the method, that value is used as the delimiter on
which to split the string.
text = "Silicon
Valley"
print(text.split())
#
Prints: ['Silicon', 'Valley']
print(text.split('i'))
#
Prints: ['S', 'l', 'con Valley']
Python
string method .find()
The
Python string method .find() returns the index of the first occurrence of the
string passed as the argument. It returns -1 if no occurrence is found.
mountain_name =
"Mount Kilimanjaro"
print(mountain_name.find("o"))
# Prints 1 in the console.
String
replace
The
.replace() method is used to replace the occurence of the first argument with
the second argument within the string.
The
first argument is the old substring to be replaced, and the second argument is
the new substring that will replace every occurence of the first one within the
string.
fruit =
"Strawberry"
print(fruit.replace('r',
'R'))
#
StRawbeRRy
String
Method .upper()
The
string method .upper() returns the string with all lowercase characters
converted to uppercase.
dinosaur =
"T-Rex"
print(dinosaur.upper())
#
Prints: T-REX
String
Method .join()
The
string method .join() concatenates a list of strings together to create a new
string joined with the desired delimiter.
The
.join() method is run on the delimiter and the array of strings to be
concatenated together is passed in as an argument.
x =
"-".join(["Codecademy", "is",
"awesome"])
print(x)
#
Prints: Codecademy-is-awesome
Lecture_2_Practical_4_String
Method *Operator
The
* operator can be used to repeat the string for a given number of times.
#
Python String Operations
str1 = 'Hello'
str2 ='World!'
# using +
print('str1 + str2 =
', str1 + str2)
# using *
print('str1 * 3 =',
str1 * 3)
Iterating
Through a string
We
can iterate through a string using a for loop. Here is an example to count the
number of 'l's in a string.
#
Iterating through a string
count = 0
for letter in 'Hello
World':
if(letter == 'l'):
count += 1
print(count,'letters
found')
Web
Reference or further reading:
https://realpython.com/python-strings/
https://www.codecademy.com/learn/learn-python-3/modules/learn-python3-strings/cheatsheet
----------------------------------------------
Lecture_3_practical_1_student class display
create a student class and initialize it with name
and roll number. make methods to :
1. display - it should display all information of
the student.
2. setage - it should assign age to student
3. setmarks - it should assign marks to the student.
class student():
def
__init__(self,name,roll):
self.name =
name
self.roll=
roll
def display(self):
print(self.name)
print(self.roll)
def setage(self,age):
self.age=age
def setmarks(self,marks):
self.marks =
marks
p=student('nikhil', '101')
p.display()
lecture_3_practice_2_point_square root
write the definition of a point class. objects from
this class should have a
a method show to display the coordinates of the
point
a method move to change these coordinates.
a method dist that computes the distance between 2
points.
import math
class point(object):
"""class to handle point in a 2 dimensions
space"""
def
__init__(self, x, y):
"""
:param x: the value on the x-axis
:type x: float
:param y: the value on the y-axis
:type y: float
"""
self.x = x
self.y = y
def
show(self):
"""
:return: the coordinate of this point
:rtype: a tuple of 2 elements (float, float)
"""
return self.x, self.y
def move(self,
x, y):
"""
:param x: the value to move on the x-axis
:type x: float
:param y: the value to move on the y-axis
:type y: float
"""
self.x += x
self.y += y
def dist(self,
pt):
"""
:param pt: the point to compute the distance with
:type pt: :class:`point` object
:return: the distance between this point ant pt
:rtype: int
"""
dx = pt.x - self.x
dy = pt.y - self.y
return math.sqrt(dx ** 2 + dy ** 2)
>>> p1=point(2,3)
>>> p2=point(3,3)
>>> p1.show()
(2, 3)
>>> p2.show()
(3, 3)
>>> p1.dist(p2)
1.0
>>> p1.move(10, -10)
>>> p1.show()
(12, -7)
>>> p1.dist(p2)
13.45362404707371
lecture_3_practice_3_deposit and withdraw
suppose we want to model a bank account with support
for deposit and withdraw operations.
class bankaccount:
def __init__(self):
self.balance = 0
def withdraw(self, amount):
self.balance -= amount
return self.balance
def deposit(self, amount):
self.balance += amount
return self.balance
a = bankaccount()
>>> b = bankaccount()
>>> a.deposit(100)
100
>>> a.deposit(100)
200
>>> a.deposit(100)
300
>>> b.withdraw(10)
-10
>>> a.withdraw(10)
290
Lecture_3_practice_4_rectangle_area
write
a python class named rectangle constructed by a length and width and a method
which will compute the area of a rectangle.
class rectangle():
def __init__(self, l, w):
self.length = l
self.width = w
def rectangle_area(self):
return self.length*self.width
newrectangle = rectangle(12, 10)
print(newrectangle.rectangle_area())
lecture_3_practice_5_time
and minutes
create a time class and initialize it with hours and
minutes.
1. make a method addtime which should take two time
object and add them.
e.g.- (2 hour and 50 min)+(1 hr and 20 min) is (4 hr
and 10 min)
2. make a method displaytime which should print the
time.
3. make a method displayminute which should display
the total minutes in the time.
e.g.- (1 hr 2 min) should display 62 minute.
class time():
def __init__(self, hours,
mins):
self.hours =
hours
self.mins =
mins
def addtime(t1, t2):
t3 = time(0,0)
if
t1.mins+t2.mins > 60:
t3.hours = (t1.mins+t2.mins)/60
t3.hours =
t3.hours+t1.hours+t2.hours
t3.mins =
(t1.mins+t2.mins)-(((t1.mins+t2.mins)/60)*60)
return t3
def displaytime(self):
print("time is",self.hours,"hours
and",self.mins,"minutes.")
def displayminute(self):
print((self.hours*60)+self.mins)
a = time(2,50)
b = time(1,20)
c = time.addtime(a,b)
c.displaytime()
c.displayminute()
lecture_3_practice_6_rectangle class and inherited
child
· rectangle class and inherited child
parallelepipede class
write a rectangle class in python language, allowing
you to build a rectangle with length and width attributes.
create a perimeter() method to calculate the
perimeter of the rectangle and a area() method to calculate the area
of the rectangle.
create a method display() that display the length,
width, perimeter and area of an object created using an instantiation on
rectangle class.
create a parallelepipede child class inheriting from
the rectangle class and with a height attribute and another volume() method to
calculate the volume of the parallelepiped.
explain inheritance in python with an example.
answer : inheritance allows one class to gain all the members(say attributes
and methods) of another class. inheritance provides code reusability, makes it
easier to create and maintain an application. the class from which we are
inheriting is called super-class and the class that is inherited is called a
derived / child class.
they are different types of inheritance supported by
python:
1. single inheritance – where a derived class
acquires the members of a single superclass.
2. multi-level inheritance – a derived class d1
in inherited from base class base1, and d2 are inherited from base2.
3. hierarchical inheritance – from one base
class you can inherit any number of child classes
4. multiple inheritance – a derived class is
inherited from more than one base class
class rectangle:
# define
constructor with attributes: length and width
def
__init__(self, length , width):
self.length = length
self.width = width
# create
perimeter method
def
perimeter(self):
return 2*(self.length + self.width)
# create area
method
def
area(self):
return self.length*self.width
# create
display method
def display(self):
print("the length of rectangle is: ", self.length)
print("the width of rectangle is: ", self.width)
print("the perimeter of rectangle is: ", self.perimeter())
print("the area of rectangle is: ", self.area())
class parallelepipede(rectangle):
def
__init__(self, length, width , height):
rectangle.__init__(self, length, width)
self.height = height
# define
volume method
def
volume(self):
return self.length*self.width*self.height
myrectangle = rectangle(7 , 5)
myrectangle.display()
print("----------------------------------")
myparallelepipede =
parallelepipede(7 , 5 , 2)
print("the volume of
myparallelepipede is: " , myparallelepipede.volume())
lecture_3_practice_7_real_car+dealer+inheritance
a car dealer hired you to create a program that
allows him to upload a description for the cars he want to upload to his
website. the description should include the make, the model, and the miles of
the car. the dealer wants after writing all the descriptions, he wants to have
an option whether to add the price.
class car:
def
__init__(self, p_make, p_model, p_miles):
self.__make=p_make
self.__model=p_model
self.__miles=p_miles
def
get_make(self):
return self.__make
def
get_model(self):
return self.__model
def
get_miles(self):
return self.__miles
class car_with_price(car):
def
__init__(self, p_make, p_model, p_miles, p_price):
car.__init__(self, p_make, p_model, p_miles)
self.__price=p_price
def
get_price(self):
return self.__price
def main():
intro()
print()
make=input('enter car make: ')
model=input('enter car model: ')
miles=input('enter the miles in the car: ')
my_car=car(make, model, miles)
print('here is
the data you entered: ')
show_data(my_car)
print()
print('do you
want to add the price also before uploading to the website?')
add_price=input('enter y for yes and n for no\n')
if
add_price.lower()=='y':
price=int(input('what is the price: '))
print()
my_car=car_with_price(make, model, miles, str(format(price, ',d')))
print('the price $',my_car.get_price(),' has been assigned to the car', sep='')
def show_data(my_car):
print('make:
', my_car.get_make())
print('model:
', my_car.get_model())
print('miles:
', my_car.get_miles())
def intro():
print('this program
will help you')
print('to
write a description for the car')
print('you
want to upload to your website')
main()
lecture_3_practice_8_real_exmaemployee+name+class
Desing using OOP a program that creates an object my_employee_information.
Then the program asks from the user to enter employee name, ID number, and his
work shift. The entered information will be assigned to the object’s data
attributes using it’s methods.
#creat class named employee
class Employee:
#we intialized all data attributes
#because in order for the methods
#operate they must know
#the data attribute type
def __init__(self):
self.__name=''
self.__id=''
self.__shift=''
def set_name(self, p_name):
self.__name=p_name
def set_id(self, p_id):
self.__id=p_id
def set_shift(self, p_shift):
self.__shift=p_shift
def get_name(self):
return
self.__name
def get_id(self):
return self.__id
def get_shift(self):
return
self.__shift
def main():
#we will create an object
my_employee_information=Employee()
name=input('enter employee name: ')
#input the id number by using try except
#to prevent any error
id_num=ask_id()
#ask for the shift
print('enter morning for morning shift')
print('or enter night for night shif')
shift=input()
print()
#assign the inputs to object
data_attributes
#using object's methods
assign(my_employee_information, name,
id_num, shift)
print('here is the the data that you
entered: ')
print('name: ',
my_employee_information.get_name())
print('ID number:
',my_employee_information.get_id())
print('shift:
',my_employee_information.get_shift())
def assign(my_employee_information, name, id_num, shift):
my_employee_information.set_name(name)
my_employee_information.set_id(str(id_num))
my_employee_information.set_shift(shift.lower())
def ask_id():
try:
id_num=int(input('enter id number: '))
return id_num
except:
print('only
enter integers')
ask_id()
main()
LECTURE_4_PRACTICE_1_LEARN
PANDAS LIBRARY
Ø Create a CSV file and import it using Pandas
Library
import pandas as pd
df = pd.read_csv('iris.csv')
print(df.to_string())
Ø Create your own Dataframe/dataset and print
the values using Pandas Library
Data sets in Pandas are usually multi-dimensional
tables, called DataFrames.
Series is like a column, a DataFrame is the whole
table.
import pandas
mydataset = {
'cars': ["BMW", "Volvo",
"Ford"],
'passings': [3, 7, 2]
}
myvar = pandas.DataFrame(mydataset)
print(myvar)
Ø Create a code with the index argument, you
can name your own labels.
import pandas as pd
a = [1, 7, 2]
myvar = pd.Series(a, index =
["x", "y", "z"])
print(myvar)
Output:-
x 1
y 7
z 2
dtype: int64
Ø Create a code with your own Python Dictionary
into a DataFrame::
import pandas as pd
data = {
"Duration":{
"0":60,
"1":60,
"2":60,
"3":45,
"4":45,
"5":60
},
"Pulse":{
"0":110,
"1":117,
"2":103,
"3":109,
"4":117,
"5":102
},
"Maxpulse":{
"0":130,
"1":145,
"2":135,
"3":175,
"4":148,
"5":127
},
"Calories":{
"0":409,
"1":479,
"2":340,
"3":282,
"4":406,
"5":300
}
}
df = pd.DataFrame(data)
print(df)
Ø Create a code full information about
DataFrame::
print(df.info())
Ø Empty Cells: Empty cells can potentially give
you a wrong result when you analyze data. Remove Rows: One way to deal with
empty cells is to remove rows that contain empty cells::
import pandas as pd
df = pd.read_csv('iris.csv')
df.dropna(inplace = True)
print(df.to_string())
#Return
a new Data Frame with no empty cells:
Note: By
default, the dropna() method returns a new DataFrame,
and will not change the original.
If
you want to change the original DataFrame, use the inplace =
True argument:
Example
Remove
all rows with NULL values:
import pandas as
pd
df = pd.read_csv('iris.csv')
df.dropna(inplace = True)
print(df.to_string())
Another
Example
Replace NULL values with
the number 130:
import pandas as
pd
df = pd.read_csv('iris.csv')
df.fillna(130, inplace = True)
REPLACE USING MEAN, MEDIAN, OR MODE
A
common way to replace empty cells, is to calculate the mean, median or mode
value of the column.
Pandas
uses the mean() median() and mode() methods to
calculate the respective values for a specified column:
Example
Calculate
the MEAN, and replace any empty values with it:
import pandas as
pd
df = pd.read_csv('iris.csv')
x = df["Calories"].mean()
df["Calories"].fillna(x, inplace = True)
Example
Calculate
the MEDIAN, and replace any empty values with it:
import pandas as
pd
df = pd.read_csv('iris.csv')
x = df["Calories"].median()
df["Calories"].fillna(x, inplace = True)
Median = the value in the
middle, after you have sorted all values ascending.
Example
Calculate
the MODE, and replace any empty values with it:
import pandas as pd
df = pd.read_csv('iris.csv')
x = df["Calories"].mode()[0]
df["Calories"].fillna(x, inplace = True)
Mode = the value that appears most
frequently.
Ø Empty Cells: Empty cells can potentially give
you a wrong result when you analyze data. Remove Rows: One way to deal with
empty cells is to remove rows that contain empty cells::
Example
Convert to date:
import pandas as pd
df = pd.read_csv('iris.csv')
df['Date'] = pd.to_datetime(df['Date'])
print(df.to_string())
Ø To replace wrong data for larger data sets
you can create some rules, e.g. set some boundaries for legal values, and
replace any values that are outside of the boundaries::
Example
Loop
through all values in the " Sepal Length" column.
If
the value is higher than 2, set it to 2.22:
for
x in df.index:
if
df.loc[x, 'Sepal Length'] > 2:
df.loc[x,
'Sepal Length'] = 2.22
DISCOVERING DUPLICATES
Duplicate
rows are rows that have been registered more than one time.
print(df.duplicated())
Returns True for
every row that is a duplicate, othwerwise False:
REMOVING DUPLICATES
To
remove duplicates, use the drop_duplicates() method.
Example
Remove
all duplicates:
df.drop_duplicates(inplace = True)
PLOTTING
Pandas
uses the plot() method to create diagrams.
Pythons
uses Pyplot, a submodule of the Matplotlib library to visualize the diagram on
the screen.
Read
more about Matplotlib in our Matplotlib Tutorial.
Example
Import
pyplot from Matplotlib and visualize our DataFrame:
import pandas as pd
import matplotlib.pyplot as plt
df = pd.read_csv('data.csv')
df.plot()
plt.show()
Ø Apply function to every row in a Pandas
DataFrameYou can use the numpy function as the parameters to the dataframe as
well.
import
pandas as pd
import
numpy as np
def
main():
#
create a dictionary with
#
five fields each
data
= {
'A':[1,
2, 3],
'B':[4,
5, 6],
'C':[7,
8, 9] }
#
Convert the dictionary into DataFrame
df
= pd.DataFrame(data)
print("Original
DataFrame:\n", df)
#
applying function to each row in the dataframe
#
and storing result in a new coloumn
df['add']
= df.apply(np.sum, axis = 1)
print('\nAfter
Applying Function: ')
#
printing the new dataframe
print(df)
if
__name__ == '__main__':
main()
LECTURE_4_PRACTICE_2_LEARN
PANDAS FOR SQL
Write the definition of a Point class. Objects from
this class should have a
a method show to display the coordinates of the
point
a method move to change these coordinates.
a method dist that computes the distance between 2
points.
https://pandas.pydata.org/pandas-docs/stable/getting_started/comparison/comparison_with_sql.html
· Most
of the examples will utilize the tips dataset found within pandas tests. We’ll
read the data into a DataFrame called tips and assume we have a database table
of the same name and structure.
import
sqlite3
url
= (
...: "https://raw.github.com/pandas-dev"
...: "/pandas/master/pandas/tests/io/data/csv/tips.csv"
...:
)
tips
= pd.read_csv(url)
tips.head()
· With
pandas, column selection is done by passing a list of column names to your
DataFrame:
tips[["total_bill",
"tip", "smoker", "time"]].head(5)
· With
pandas, you can use the DataFrame.assign() method of a DataFrame to append a
new column:
tips.assign(tip_rate=tips["tip"]
/ tips["total_bill"]).head(5)
· Notice
that in the pandas code we used size() and not count(). This is because count()
applies the function to each column, returning the number of not null records
within each.
tips.groupby("sex").size()
· Update:
tips.loc[tips["tip"]
< 2, "tip"] *= 2
· Delete:
tips
= tips.loc[tips["tip"] <= 9]
LECTURE_5_PRACTICE_1_LEARN
NUMPY
NumPy provides
an N-dimensional array type, the ndarray, which
describes a collection of “items” of the same type. The items can be indexed using
for example N integers.
All ndarrays are homogeneous:
every item takes up the same size block of memory, and all blocks are interpreted
in exactly the same way. How each item in the array is to be interpreted is
specified by a separate data-type object,
one of which is associated with every array. In addition to basic types
(integers, floats, etc.), the data type objects can also represent
data structures.
An item extracted from an array, e.g.,
by indexing, is represented by a Python object whose type is one of the array scalar types built
in NumPy. The array scalars allow easy manipulation of also more complicated
arrangements of data.
The N-dimensional array (ndarray)
An ndarray is
a (usually fixed-size) multidimensional container of items of the same type and
size. The number of dimensions and items in an array is defined by its shape,
which is a tuple of N non-negative
integers that specify the sizes of each dimension. The type of items in the
array is specified by a separate data-type object (dtype),
one of which is associated with each ndarray.
As with other container objects in Python,
the contents of an ndarray can
be accessed and modified by indexing or slicing the
array (using, for example, N integers), and via the methods
and attributes of the ndarray.
import
numpy as np
a =
np.array([1,2,3])
print(a)
-------------------
#
more than one dimensions
import
numpy as np
a =
np.array([[1, 2], [3, 4]])
print(a)
---------------------------------------
x =
np.arange(27).reshape((3,3,3))
------------------------------
x.dtype()
-----------------------------
import numpy as np
# Creating array object
arr = np.array( [[ 1, 2, 3],
[
4, 2, 5]] )
# Printing type of arr object
print("Array is of type: ", type(arr))
# Printing array dimensions (axes)
print("No. of dimensions: ", arr.ndim)
# Printing shape of array
print("Shape of array: ", arr.shape)
# Printing size (total number of elements) of array
print("Size of array: ", arr.size)
# Printing type of elements in array
print("Array stores elements of type: ",
arr.dtype)
import numpy as np
# Creating array from list with type float
a = np.array([[1, 2, 4], [5, 8, 7]], dtype
= 'float')
print ("Array created using passed
list:\n", a)
# Creating array from tuple
b = np.array((1 , 3, 2))
print ("\nArray created using passed
tuple:\n", b)
# Creating a 3X4 array with all zeros
c = np.zeros((3, 4))
print ("\nAn array initialized with all
zeros:\n", c)
# Create a constant value array of complex type
d = np.full((3, 3), 6, dtype = 'complex')
print ("\nAn array initialized with all
6s."
"Array
type is complex:\n", d)
# Create an array with random values
e = np.random.random((2, 2))
print ("\nA random array:\n", e)
# Create a sequence of integers
# from 0 to 30 with steps of 5
f = np.arange(0, 30, 5)
print ("\nA sequential array with steps of
5:\n", f)
# Create a sequence of 10 values in range 0 to 5
g = np.linspace(0, 5, 10)
print ("\nA sequential array with 10 values
between"
"0
and 5:\n", g)
# Reshaping 3X4 array to 2X2X3 array
arr = np.array([[1, 2, 3, 4],
[5,
2, 4, 2],
[1,
2, 0, 1]])
newarr = arr.reshape(2, 2, 3)
print ("\nOriginal array:\n", arr)
print ("Reshaped array:\n", newarr)
# Flatten array
arr = np.array([[1, 2, 3], [4, 5, 6]])
flarr = arr.flatten()
print ("\nOriginal array:\n", arr)
print ("Fattened array:\n", flarr)
· Slicing: Just
like lists in python, NumPy arrays can be sliced. As arrays can be
multidimensional, you need to specify a slice for each dimension of the array.
· Integer array indexing: In this method, lists are passed for indexing for
each dimension. One to one mapping of corresponding elements is done to construct
a new arbitrary array.
· Boolean array indexing: This method is used when we want to pick elements
from array which satisfy some condition.
import numpy as np
# An exemplar array
arr = np.array([[-1, 2, 0, 4],
[4,
-0.5, 6, 0],
[2.6,
0, 7, 8],
[3,
-7, 4, 2.0]])
# Slicing array
temp = arr[:2, ::2]
print ("Array with first 2 rows and
alternate"
"columns(0
and 2):\n", temp)
# Integer array indexing example
temp = arr[[0, 1, 2, 3], [3, 2, 1, 0]]
print ("\nElements at indices (0, 3), (1, 2),
(2, 1),"
"(3,
0):\n", temp)
# boolean array indexing example
cond = arr > 0 # cond is a boolean array
temp = arr[cond]
print ("\nElements greater than 0:\n",
temp)
Basic operations: Plethora
of built-in arithmetic functions are provided in NumPy.
· Operations on single array: We
can use overloaded arithmetic operators to do element-wise operation on array
to create a new array. In case of +=, -=, *= operators, the exsisting array is
modified.
#
Python program to demonstrate
#
basic operations on single array
import
numpy as np
a =
np.array([1, 2, 5, 3])
#
add 1 to every element
print
("Adding 1 to every element:", a+1)
#
subtract 3 from each element
print
("Subtracting 3 from each element:", a-3)
#
multiply each element by 10
print
("Multiplying each element by 10:", a*10)
#
square each element
print
("Squaring each element:", a**2)
#
modify existing array
a
*= 2
print
("Doubled each element of original array:", a)
#
transpose of array
a =
np.array([[1, 2, 3], [3, 4, 5], [9, 6, 0]])
print
("\nOriginal array:\n", a)
print
("Transpose of array:\n", a.T)
· Binary operators: These
operations apply on array elementwise and a new array is created. You can use
all basic arithmetic operators like +, -, /, , etc. In case of +=, -=, =
operators, the exsisting array is modified.
#
Python program to demonstrate
#
binary operators in Numpy
import
numpy as np
a =
np.array([[1, 2],
[3, 4]])
b =
np.array([[4, 3],
[2,
1]])
#
add arrays
print
("Array sum:\n", a + b)
#
multiply arrays (elementwise multiplication)
print
("Array multiplication:\n", a*b)
#
matrix multiplication
print
("Matrix multiplication:\n", a.dot(b))
np.random.normal(0,
1, (3,3))
LECTURE_6_PRACTICE_1_LEARN
IMAGE PROCESSING USING PYTHON
Note: If images are not visible below click here
HOW DO MACHINES STORE
IMAGES?
Let’s
start with the basics. It’s important to understand how we can read and store
images on our machines before we look at anything else. Consider this the ‘pd.read_‘
function, but for images.
I’ll
kick things off with a simple example. Look at the image below:
We
have an image of the number 8. Look really closely at the image – you’ll notice
that it is made up of small square boxes. These are called pixels.
There
is a caveat, however. We see the images as they are – in their visual form. We
can easily differentiate the edges and colors to identify what is in the
picture. Machines, on the other hand, struggle to do this. They store images in
the form of numbers. Have a look at the image below:
Machines store images in the form of a matrix
of numbers. The size of this matrix depends on the number of pixels we have in
any given image.
Let’s say the dimensions of an image are 180
x 200 or n x m. These dimensions are basically the number of pixels in the
image (height x width).
These numbers, or the pixel values,
denote the intensity or brightness of the pixel. Smaller
numbers (closer to zero) represent black, and larger numbers (closer to 255)
denote white. You’ll understand whatever we have learned so far by analyzing
the below image.
1. SimpleITK
ITK (Insight Segmentation and Registration
Toolkit) is an "open source, cross-platform system that provides
developers with an extensive suite of software tools for image analysis.
SimpleITK is a simplified layer built on top of ITK, intended to facilitate its
use in rapid prototyping, education, [and] interpreted languages." It's
also an image analysis toolkit with a large number of components supporting
general filtering operations, image segmentation, and registration. SimpleITK
is written in C++, but it's available for a large number of programming
languages including Python.
2. SciPy
SciPy is another of Python's core scientific
modules (like NumPy) and can be used for basic image manipulation and
processing tasks. In particular, the submodule scipy.ndimage (in SciPy v1.1.0)
provides functions operating on n-dimensional NumPy arrays. The package
currently includes functions for linear and non-linear filtering, binary
morphology, B-spline interpolation, and object measurements.
3. scikit-image
scikit-image is an open source Python package
that works with NumPy arrays. It implements algorithms and utilities for use in
research, education, and industry applications. It is a fairly simple and
straightforward library, even for those who are new to Python's ecosystem. The
code is high-quality, peer-reviewed, and written by an active community of
volunteers.
4. OpenCV-Python
OpenCV (Open Source Computer Vision Library)
is one of the most widely used libraries for computer vision applications. OpenCV-Python
is the Python API for OpenCV. OpenCV-Python is not only fast, since the
background consists of code written in C/C++, but it is also easy to code and
deploy (due to the Python wrapper in the foreground). This makes it a great
choice to perform computationally intensive computer vision programs.
Further
Reading orweb reference:
https://www.analyticsvidhya.com/blog/2019/09/9-powerful-tricks-for-working-image-data-skimage-python/
Ø Using skimage
library :
scikit-image is a Python package dedicated to
image processing, and using natively NumPy arrays as image objects. This
chapter describes how to use scikit-image on various image processing tasks,
and insists on the link with other scientific Python modules such as NumPy and
SciPy.
from skimage import data,
io, filters
image = data.coins()
# ... or any other NumPy
array!
edges = filters.sobel(image)
io.imshow(edges)
io.show()
import
skimage
from
skimage import data
>Read
image from Computer:
import
numpy as np
import
cv2
img
= cv2.imread('r.jpg')
imshow(img)
Show
Image using SKIMAGE:
from
skimage.io import imread, imshow
from
skimage import data
image
= data.astronaut()
imshow(image)
>>Convert
Image into GreyScale:
The imread function has a parameter “as_gray”
which is used to specify if the image must be converted into a grayscale image
or not. We will start with reading an image in grayscale format, by setting the
parameter to true:
from
skimage.io import imread, imshow
import
matplotlib.pyplot as plt
%matplotlib
inline
image_gray
= imread('r.jpg', as_gray=True)
imshow(image_gray)
OR
from
skimage.color import rgb2gray
img
= imread('r.jpg')
img_new
= rgb2gray(img)
plt.subplot(121),
imshow(img)
plt.title('RGB
Format')
plt.subplot(122),
imshow(img_new)
plt.title('Grayscale
Format')
plt.show()
camera
= data.camera()
camera.dtype
camera.shape
from
skimage import filters
filtered_camera
= filters.gaussian(camera, 1)
type(filtered_camera)
>>Resize
the image
from
skimage.transform import resize
img
= imread('r.jpg')
#resize
image
img_resized
= resize(img, (300, 300))
#plot
images
plt.subplot(121),
imshow(img)
plt.title('Original
Image')
plt.subplot(122),
imshow(img_resized)
plt.title('Resized
Image')
plt.show()
NOTE: IF IMAGES ARE NOT VISIBLE BELOW CLICK HERE
Rotate any Image:
To fix this orientation
problem, we will need to rotate the image by a certain angle. We can use
the rotate function of skimage and specify the angle by which
we need the image to be rotated:
from
skimage.transform import rotate
image
= imread('r.jpg')
image_rotated
= rotate(image, angle=45)
imshow(image_rotated)
Rotate
any Image without losing the image property and cropping :
The orientation problem is
all fixed. But if you look closely, the picture is cropped around the corners.
This is because, during the rotation, the size of the image remains the same
causing the area around the corner to get cropped.
We are not losing any
important information in this scenario but that might not always be the case.
This obstacle is taken care of by the resize parameter in
the rotate function (by default the parameter value is False):
from skimage.transform import rotate
image = imread('r.jpg')
image_rotated = rotate(image, angle=45,
resize=True)
imshow(image_rotated)
FLIP IMAGES HORIZONTALLY AND VERTICALLY
We can flip an image both horizontally and
vertically. This creates a mirror image along the horizontal/vertical axis. We
can use this technique for both image preprocessing and image augmentation.
Although there is no direct function for this
in skimage, we can use NumPy to perform this task.
NumPy provides
functions flipud and fliplr for flipping the images
across the horizontal and vertical axis respectively.
from numpy import fliplr, flipud
dog = imread('r.jpg')
cat = imread('r.jpg') #Take
another image as input
dog_flip = fliplr(dog)
cat_flip = fliplr(cat)
plt.subplot(141), imshow(dog)
plt.subplot(142), imshow(dog_flip)
plt.subplot(143), imshow(cat)
plt.subplot(144), imshow(cat_flip)
plt.show()
NOTE: IF IMAGES ARE NOT VISIBLE BELOW CLICK HERE
CROP IMAGES
You must have used the cropping function on
your phone a gazillion times. I do it way too often!
You can crop images inside your Python
notebook as well using skimage. We crop images to remove the unwanted portion
of the image or to focus on a particular part of the image.
Let’s say we have the below image from a
basketball match (left image). In its current form, the shape of the image is
1067 x 1600. Now, I want to remove 100 pixels from all 4 sides of the image.
This would mean that we remove 100 pixels from the top, bottom, left and right
of the image, thus focusing on the object at the center:
There
are two ways to achieve this:
·First, simply specify the new image shape you
want. For this example, it would be image [100:967, 100:1500]. This will
work fine for a single image. What if we have multiple images? We would have to
mention the new image shape for every image (not ideal).
·Another way could be
to calculate the cropped image
dimension using the current image shape, which can be determined using the command image.shape.
So the height of the new image would be [100:img.shape[0]-100] and
the width will be [100:img.shape[1]-100].
So,
let’s crop the above image using the second method:
image = imread('r.jpg')
# selecting part of the image only
cropped = image[100:(img.shape[0]-100),10:(img.shape[1]-100)]
plt.subplot(121), imshow(image)
plt.title('Original Image')
plt.subplot(122),imshow(cropped)
plt.title('Cropped Image')
plt.show()
ALTERING IMAGE BRIGHTNESS
USING SKIMAGE
How often do you fiddle around with the
brightness of an image you took in a bad light? Despite the recent advances in
how cameras function, low light imaging is a headache. skimage will fix that
for us.
Images with different brightness can be used
to make our computer vision model robust to changes in lighting conditions.
This is important for systems that work in
outdoor lighting, for instance, CCTV cameras on traffic signals.
The brightness of images can be changed using
the adjust_gamma function in skimage, which uses a method
called gamma correlation. For
any given image, the pixel values are first normalized between 0 – 1 and then
multiplied by a specified gamma value. The resulting pixel values are scaled
back to the range 0-255.
For gamma greater than 1, the output image will
be darker than the input image. While for gamma less than 1, the output image
will be brighter than the input image.
from skimage import
exposure
#adjusting brightness
image = imread('r.jpg')
image_bright = exposure.adjust_gamma(image,
gamma=0.5,gain=1)
image_dark = exposure.adjust_gamma(image,
gamma=3,gain=1)
# plotting images
plt.subplot(131), imshow(image)
plt.title('Original Image')
plt.subplot(132),imshow(image_bright)
plt.title('Bright Image')
plt.subplot(133),imshow(image_dark)
plt.title('Dark Image')
plt.show()
Using
Filters in skimage
We can use Filters to modify or enhance an
image’s features. You’ll be pretty familiar with filters if you’ve ever played
around with images on social media platforms.
We can use filters for various purposes, such
as smoothing and sharpening the image, removing noise, highlighting features
and edges in the image, etc.
When we apply a filter on an image, every
pixel value is replaced by a new value generated using surrounding pixel
values. The simplest filter is the median filter, where the pixel values are
replaced with the median of neighboring pixels.
NOTE: IF IMAGES ARE NOT VISIBLE BELOW CLICK HERE
from
skimage.filters import median
image
= imread('r.jpg', as_gray=True)
image_median
= median(image)
#
plotting images
plt.subplot(121),
imshow(image)
plt.title('Original
Image')
plt.subplot(122),imshow(image_median)
plt.title('Smooth
Image')
plt.show()
NOTE: IF IMAGES ARE NOT VISIBLE BELOW CLICK HERE
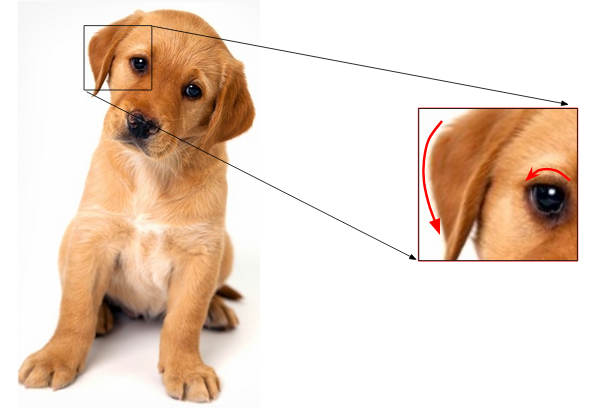
EXTRACTING EDGE
FEATURES: CONSIDER THAT WE ARE GIVEN THE BELOW IMAGE AND WE NEED TO
IDENTIFY THE OBJECTS PRESENT IN IT:
You must have recognized
the objects in an instant – a dog, a car and a cat. What are the features that
you considered while differentiating each of these images? The shape could be
one important factor, followed by color, or size. What if the machine could
also identify the shape as we do?
A similar idea is to
extract edges as features and use that as the input for the model. I want you
to think about this for a moment – how can we identify edges in an image? Edge
is basically where there is a sharp change in color. Look at the below image:
I have highlighted two
edges here. We could identify the edge because there was a change in color from
white to brown (in the right image) and brown to black (in the left). And as we
know, an image is represented in the form of numbers. So, we will look for
pixels around which there is a drastic change in the pixel values.
Let’s say we have the
following matrix for the image:
To identify if a pixel is
an edge or not, we will simply subtract the values on either side of the pixel.
For this example, we have the highlighted value of 85. We will find the
difference between the values 89 and 78. Since this difference is not very
large, we can say that there is no edge around this pixel.
Now consider the pixel 125
highlighted in the below image:
Since the difference
between the values on either side of this pixel is large, we can conclude that
there is a significant transition at this pixel and hence it is an edge. Now
the question is, do we have to do this step manually?
No! There are various
kernels that can be used to highlight the edges in an image. The method we just
discussed can also be achieved using the Prewitt kernel (in the x-direction).
Given below is the Prewitt kernel:
We take the values surrounding the selected pixel and
multiply it with the selected kernel (Prewitt kernel). We can then add the
resulting values to get a final value. Since we already have -1 in one column
and 1 in the other column, adding the values is equivalent to taking the
difference.
There are various other kernels and I have mentioned four
most popularly used ones below:
#importing
the required libraries
import
numpy as np
from
skimage.io import imread, imshow
from
skimage.filters import prewitt_h,prewitt_v
import
matplotlib.pyplot as plt
%matplotlib
inline
#reading
the image
image
= imread('r.jpg',as_gray=True)
#calculating
horizontal edges using prewitt kernel
edges_prewitt_horizontal
= prewitt_h(image)
#calculating
vertical edges using prewitt kernel
edges_prewitt_vertical
= prewitt_v(image)
imshow(edges_prewitt_vertical,
cmap='gray')
NOTE: IF IMAGES ARE NOT VISIBLE BELOW CLICK HERE
OS Module in Python: The OS module in Python provides functions for interacting with the
operating system. OS comes under Python’s standard utility modules. This module
provides a portable way of using operating system-dependent functionality. The
*os* and *os.path* modules include many functions to interact with the file
system.
HANDLING THE CURRENT WORKING
DIRECTORY
Consider Current Working Directory(CWD) as
a folder, where the Python is operating. Whenever the files are called only by
their name, Python assumes that it starts in the CWD which means that name-only
reference will be successful only if the file is in the Python’s CWD.
import os
# Get the current working
# directory (CWD)
cwd = os.getcwd()
# Print the current working
# directory (CWD)
print("Current working directory:", cwd)
Installing
Open CV in Anacoonda:
>>pip
install opencv-python
>>import
cv2
NOTE: IF IMAGES ARE NOT VISIBLE BELOW CLICK HERE
Further reading or web references:
Machine Learning Tutorial Python - 2: Linear Regression Single Variable:
https://www.youtube.com/watch?v=8jazNUpO3lQ
 Program: 0: Introduction
List of Top 10 Best Free Sources to Learn Python Programming
Awesome website to learn basic tutorial step wise, Python codes are clearly written to run on compiler. Description of the relevant code is also given there.
A to Z summary of all lessons are given here just click on the content list and find the code. Advanced and Beginning codes are clearly mentioned over here.
A school to learn basic fundamental of Python is described here. Although advance codes for the learners are not given here yet it is sufficient to learn Python.
Despite of many rumors about authenticity of Wikibooks, this web page has been set an example to the learners, although readers required to use their own outputs with appropriate code.
In order to detail coding of Python 3.4 this youtube channel consists total of 56 videos for step by step learning classes. You will have to intensively search the code to get the output.
Along with run code and .py file one can easily verify the code without installing the software on PC, later can verify on his PC. Just for learning purpose from anywhere this website will be beneficial for beginners.
Excellent blog with Project support for Engineering students as well as various advance coding can be find there.
One of the Most valuable and famous resource for the Python programming this website has establish such an example for students and learners.
Google always been successful provider for various users and learners all over span on www, therefore trustworthy and experienced platform to learn this language.
- The Python Tutorial
Last but not least for all kind of learners, must visit site for implementations of various online projects.
Thanks and Best of Luck !!!


